2025-02-16 10:24:35 +01:00
---
title: "Install Kodi in an LXC and Connect it to a Monitor/TV Using GPU Acceleration"
2025-02-16 10:37:33 +01:00
description: "Install Kodi in an LXC container on Proxmox, utilize GPU acceleration, and connect it to your TV, turning your Proxmox server into an all-in-one media center."
2025-02-16 10:24:35 +01:00
---
We'll use the script created by user [mrrudy ](https://github.com/mrrudy ).
To be able to use a keyboard, mouse, or any USB controller after installation, we must install the container with privileges.
```bash
bash -c "$(wget -qLO - https://raw.githubusercontent.com/mrrudy/proxmoxHelper/main/ct/kodi-v1.sh)"
```
Be patient, it takes time to install.
Access to tty7 means we can now connect our monitor or TV.
### Keyboard, Mouse, or USB Controller
The keyboard, mouse, or USB controllers are /dev/input devices. To add them to the LXC, we need to know their code:
```bash
ls -l /dev/input
```
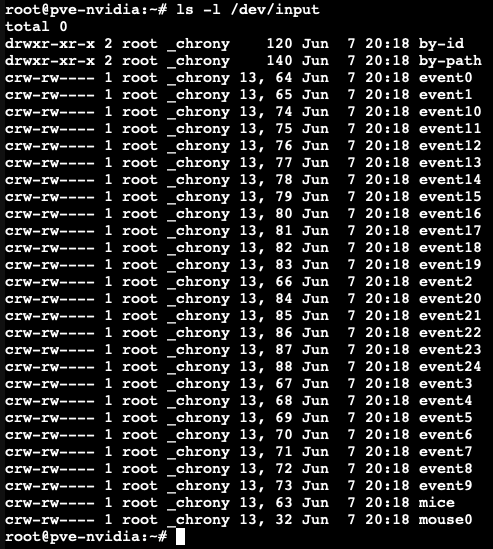
In my case, the code is 13.
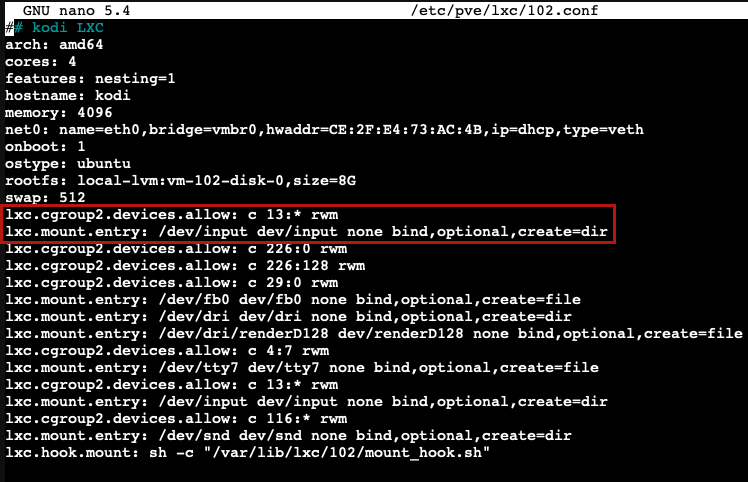
We add to our LXC configuration:
For example, 102 is the id of my Kodi container
```bash
nano /etc/pve/lxc/102.conf
```
Add these lines:
```
lxc.cgroup2.devices.allow = c 13:* rwm
lxc.mount.entry: /dev/input dev/input none bind,optional,create=dir
```
When we're done, we restart Proxmox:
```bash
reboot
```
### Updating Kodi
Inside the container's console:
```bash
sudo add-apt-repository ppa:team-xbmc/ppa
```
```bash
sudo apt install kodi kodi-bin
```
When it's finished, we restart, and when it boots up, we'll have Kodi updated.
### Images
We can learn more about configuring an LXC with Intel GPU on [Konpat's blog ](https://blog.konpat.me/dev/2019/03/11/setting-up-lxc-for-intel-gpu-proxmox.html ).
## Support the Author
< div style = "display: flex; justify-content: center; align-items: center;" >
< a href = "https://ko-fi.com/G2G313ECAN" target = "_blank" style = "display: flex; align-items: center; text-decoration: none;" >
< img src = "https://raw.githubusercontent.com/MacRimi/HWEncoderX/main/images/kofi.png" alt = "Support me on Ko-fi" style = "width:175px; margin-right:65px;" / >
< / a >
< / div >
If you found this tutorial helpful and useful, you can buy me a Ko-fi! Thank you! 😊